pirogue X two | SouthernPaddler.com

pirogue X two

captaindoug

Well-Known Member
Nov 18, 2009
142
0
71
Tampa Bay, Florida
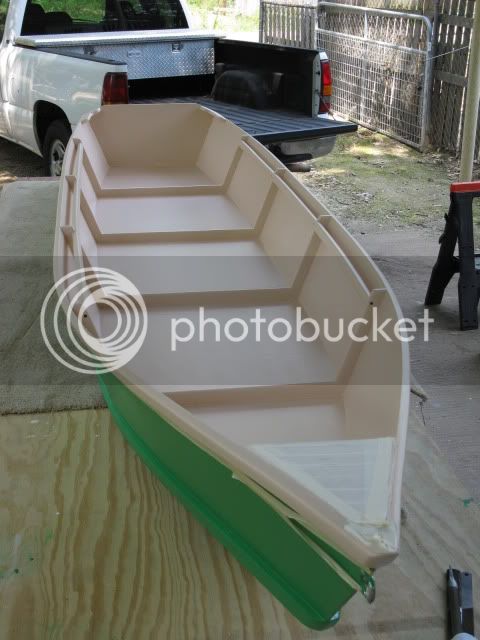
I have a few pics of the new Uncle John's Pirogues my son and I have started. We are using Luan for the sides and 1/4" for the bottom, leaving the good sides inside. Cypress for rub rails/gunnels. We have a sawmill nearby, so we re-sawed the rough cut cypress for the gunnels. We inletted the rail so no raw edge of the ply will be exposed, took a bit of extra work, but we like the way it is turning out. Using epoxy to glue the rails on, and drywall screws to "clamp" the rail until the epoxy has kicked and then the screws will come out. Seems like a lot of torque on those ribs, so we put some temp. thwarts between the ribs while we cranked down on the rails. Also considering some sort of shear clamp or "inwale". We are trying to go as light weight as possible, but that would give us something to tie stuff, ( folding chair, paddle, anchor, etc.) BTW, Uncle John was very prompt with delivery and returned Emails with a small question I had. Nice!

pirogue%20a22.jpg


This one is 13'-8 and the next one will be 14'-4 with four ribs so hopefully they will nest together for both for ease of transport and ease of storage. Son is 185lbs, and I am 245 too many lbs, that's why we are making the different sizes

Got the rub rails glued on today, nothing broke, but seems as though we introduced a little twist in the boat. It is still straight stem to stem. We clamped it with a shim under the low side and hopefully when the epoxy is dry, it will have taken some of the twist out. Not real worried about it yet, still have the bottom to attach, we are hoping that will help us with this issue.

A few new observations on things we won't do on the build of the second one. We cut limber/weep holes in the bottom member of the ribs, and upon a closer look at them, one cracked right at the cut. Next time I will radius the hole, maybe just with my belt sander, it doesn't have to be that big. When we flipped it over, we discovered that although we had gotten almost all the twist out of the boat by clamping some reverse twist into it while the rubrails dried, the bottom of the side panels had lost a lot of the "fairness" in their lines, actually became quite wavy, probably due to using the thin luan, so we temp. screwed some trim moulding along the bottom outside to bring some fairness back.

We got the bottom on and had a near disaster. Using the glue and stack method(cider blocks, bricks, and pavers) we just put the last block on top when I looked down at the sawhorses and they were in the process of caving in, about to drop the whole deal to the ground. Luckily, my son John was right there to help, and I wrapped a line around the boat and tied it off to the wheel of the camper. It stayed that way for 24 hrs, and we got all the weight off, it turns out all the twist I was concerned about is no longer there. yea! Of course, right after that we beefed up the sawhorses. That would have been dis-heartening to have the "Yacht" crash to pieces underneath two or three hundred pounds of concrete blocks, because of an ill thought out support system. Just a word to the wise.

We kinda cheated on the joints for the bottom, I just butted them at the end ribs, splitting the joint half and half on the rib. I taped the ribs in and used an empty caulking tube to apply the fillet, came after with a tongue depressor to shape it and taped it wet on wet. I also glassed the two inside center sections with the same cloth (4 oz.) I am going to put over the bottom outside

Some more photos of the construction can be seen at this link: http://www.forumpictureprocessor.com/ga ... llery=2107
 

captaindoug

Well-Known Member
Nov 18, 2009
142
0
71
Tampa Bay, Florida
Thanks for the good word, and as far as putting the "pretty" side up, I thought since the bottom is gonna be glassed and painted anyway. I have a question about the graphite mixed in the epoxy for a bottom coat. Is that the final coat or second to last coat? I guess you don't add so much as to thicken the epoxy very much? I bought a small bag of it to try but haven't seen any instructions on mixing with the epoxy.
 

oldsparkey

Well-Known Member
Aug 25, 2003
10,479
123
Central , Florida
www.southernpaddler.com
If you build two Pirogues ( The same size ) and leave off the decks they will stack together without any problems. Naturally that is without a permanent seat in them.

When I epoxy the floor on the ones I make I do not use excess weight on the boat since the extra weight can squeeze out some of the epoxy creating an epoxy starved joint. You should not have that worry since you did fillet the seams and then glass the boat.

The weep holes I make are done with a 1 inch round sanding drum in the drill and I cut/sand into the rib about a 1/8th of an inch.Don't need a lot of room for water to run threw.

The epoxy and graphite mix is the last step , when I mix it I use a double batch of epoxy and three heaping spoons of the graphite , I also put three coats on the boat , one each day. I like to mix the graphite in the epoxy , then mix it again to make sure there are no lumps of it in the mix , then add the hardener , mix it again and apply it to the boat.

Yes.. Building boats is a learning experience , no matter how many you have built. As far as making them light weight , the best I have done , so far , with the full size pirogues is 32 pounds , the seat I put in it weighs 2 1/2 pounds . It is going to be removed and I will use one of the seats I dreamed up which is removable.

By the way ... Welcome to the world of building wood boats. :D

Chuck.
 

captaindoug

Well-Known Member
Nov 18, 2009
142
0
71
Tampa Bay, Florida
Thank you for the response, Kind Sir.

Three coats in three days, does that mean washing/ sanding between coats of graphite?

I bought the plan for your well thought out and comfy looking seat, and we are making them out of the sawmill cypress, so after they dry out, they should be pretty light also.

The waters of Tampa Bay where we will be "Yachting" in our Pirogues have some pretty skinny spots, so we are truly trying to make them light enough to float on "wet grass".

I have been reading the debate between single blade paddles or twin blade Kayak paddles, and although we are accomplished canoeists, (Boy Scout Merit Badge), J stroke etc., I can see instances where a push pole would be cool, both for motivation, and staking out on the flats. What is the consensus, carry both, pole and paddle?

Thanks again for the kind welcome.
pirogue%2013.jpg
 

oldsparkey

Well-Known Member
Aug 25, 2003
10,479
123
Central , Florida
www.southernpaddler.com
NO, You don't need to sand it between coats of the graphite mix. It is really messy when sanded , you will get black graphite all over you and anything near you. By doing it a day apart there would not be any blush with the mix. It is my understanding you can go up to 72 hours without that worry but I like to do it every day for safety's sake. Main reason is I know the coat before then has set so there's no worry about working on wet epoxy.

You can wash and sand if you want to , I don't. The folks who race sailboats sand the graphite to get rid of the outer skin of epoxy ( the glossy part you will see) to make the boat slip threw the water better. For us paddlers it is not necessary to do it. I figure that glossy part is extra protection for the bottom.
One exception... If you re-coat the bottom at a later date then it should be sanded before re-coating it so the new coat will bond to the old coat. I redid the coating on one of my canoes and to play it safe , I sanded it before applying the new coat , that is why I know it is one messy job.

The nice thing about pirogues , beside there shallow draft is that they can be paddled anyway you want to , single blade , double blade and even poled if desired.
Personally when going down stream I like a single paddle and then going back up stream ( or covering some water in a hurry ) the double or kayak paddle. I haven't poled one , don't trust my balance that well to try it. Other guys have poled them and stand up in them when bow fishing and some stand when fishing with a rod an reel.

Chuck.
 

Kayak Jack

Well-Known Member
Aug 26, 2003
13,976
171
86
Okemos / East Lansing Michigan
Cap'n Doug, carrying both pole and paddle is about the same as carrying a primary and secondary paddle. It's called prudent.

If you do any "poling" with a paddle, I always try to line up the axis of the blade with direction of intended travel. That way, as the boat moves, the paddle (probably dug into the mud or sand by this time) can simply rotate. If the blade is at a 90 degree angle to path of travel, you can either lose the paddle or break it. Neither choice is desirable.

I used to teach both canoe and backpacking merit badges. Had lots of good times with Scouting - Cub, Boy, and Girl types.
 

captaindoug

Well-Known Member
Nov 18, 2009
142
0
71
Tampa Bay, Florida
Good info, thanks gentlemen. Since we are building two of 'em, I guess it would be prudent to get a kayak and single blade paddle to see which we like, and then go investigate my neighbor's stand of bamboo for a couple push poles. He said, "help yourself", so I think I'll take him up on it. Probably a little lighter and a little more spring to bamboo than a closet rod. I have a high dollar carbon fiber/ fiberglass push pole for my flats skiff, but it is 19ft long. Might be a bit of overkill on the pirogue.
 

oldsparkey

Well-Known Member
Aug 25, 2003
10,479
123
Central , Florida
www.southernpaddler.com
With the bamboo if you cut it green and want it straight when dried .... Tie a string around the small end . Tie that string off to something so the bamboo hangs there , then attach a light weight to the butt end and let nature do it's thing while the bamboo hangs there. :D

Chuck.
 

captaindoug

Well-Known Member
Nov 18, 2009
142
0
71
Tampa Bay, Florida
New%20yachts%20021.jpg

I don't have a suitable spot to hang the bamboo as you suggested, so I am trying to "splint" them. I left them as seen for about a week, unwrapped them and re-wrapped them where they needed some further straightening. It seems to be working.
 

captaindoug

Well-Known Member
Nov 18, 2009
142
0
71
Tampa Bay, Florida
First Float
New%20yachts%20052.jpg

New%20yachts%20056.jpg

New%20yachts%20058.jpg

New%20yachts%20059.jpg

We still need to paint and do a few other things(gonna add an inwale), but she floats! We borrowed that Hobie Kayak in the photo as a support vessel. The kayak was a little bit faster in the sprint, but the pirogue made up for it with the comfort level, plus the kayak drew about five or six inches with my 250+lbs, but the pirogue drew only half that. That, and no "Soggy Bottom" like in the kayak.
I guess the greatest sign of success was the smile on my son's face, and the comment, "this is really nice, man"
 

captaindoug

Well-Known Member
Nov 18, 2009
142
0
71
Tampa Bay, Florida
Hello all, I have been searching the posts and reading up on square back pirogues and skiffs, lots of good info, and I am about to start # 2 when I get off this tug boat next week, so here are a few questions. I drew the plan view on my little CAD program of a pirogue 14'-2 long x 30" wide at the chines, image on bottom. I then super-imposed that image over what I am considering doing to # 2. Basically, pushing the transom all the way back to where the aft stem would start instead of pinching the ends and then cutting off and placing a transom in the stern. Since I have already attached both stems to one of my sides, this modification will have to start at the short side of the 45 degree cut on that end, which will effectively shorten the boat to around 13'-6 LOA.
pirogue2.jpg

I believe the rocker on the bottom would remain approximately the same but it would increase the wetted area quite a bit. I should still be able to paddle I expect. The transom bottom dimension was arbitrarily drawn at 20", ten less than maximum width of 30". That could of course be messed around with, and probably should be narrower than that. The whole point of this exercise, is as you can see from the maiden voyage in # 1, I filled that little boat up with my "petite" figure and I am looking to get a little more load carrying capability and more stability, and OK, I admit it, I really like the looks of the new Bayou Skiff. Besides the rather blatant plagiarism. do you think it would work?
 

seedtick

Well-Known Member
Jul 22, 2006
1,161
7
Denham Springs, LA
No plagiarism - folks been building boats like this for years

check out Beekeeper's thread on the skiff he built

the larger footprint will give you more stability and capacity

probably want to consider changing the cut back on the sides at the back so the transom will be closer to vertical in case you ever mount a motor back there.

rocker on the front will stay the same as if it were still a pirogue built to that configuration (flare, width, length) but rocker in the back will decrease as you're not pulling the sides (in the back) in as far

that's the fun of building your own, you can tweak it any way you want
 

oldsparkey

Well-Known Member
Aug 25, 2003
10,479
123
Central , Florida
www.southernpaddler.com
That's the beauty of the piorgues ( they are very versatile and modifiable ) you can do them just about anyway you want. A lot of folks add the 4th rib to theirs to widen the center of the boat and to add stability.
If you wanted a wider and square stern pirogue , then the Bayou Skiff style would be the answer and to answer your question....... Yes , your sketch would work.

Here is the link to Beekeepers 1st boat.
CrocBoat034-1.jpg

Go here for the full article......viewtopic.php?f=10&t=6178

This one he said he liked a lot better and is a kissing cousin ( inspiration ) to the Bayou Skiff.

IMG_0391.jpg


Go here for the full article.......viewtopic.php?f=10&t=7100

Chuck.
 

captaindoug

Well-Known Member
Nov 18, 2009
142
0
71
Tampa Bay, Florida
Thanks for your replies gentlemen, I did buy a three rib kit (the son's boat)and a four rib kit from Uncle John's and I am going to use the four rib kit for this one, although I will probably need a "rib stretcher" if I square the stern. Concerning the angle of the transom, I have it drawn at 13 degrees, (typical of most outboard boats, 12-13 degrees). Are you recommending it be more vertical?
 

seedtick

Well-Known Member
Jul 22, 2006
1,161
7
Denham Springs, LA
no, 10 to 15 degrees is a good angle for a transom

the reason for the comment is that i thought the Uncle John sides had cutbacks (rake) of 45 degrees and I wanted you to think a bit before putting in a transom at 45 degrees.

you're doing good.......
 

captaindoug

Well-Known Member
Nov 18, 2009
142
0
71
Tampa Bay, Florida
Oh, yes sir, that is the case (45 degree rake) and I have indeed already epoxied both stems to one side, so I will have to cut one stem off and change that angle to the 10 to 15 degrees. That is how I came up with the 13'-6 instead of the 14'-2 I started with. My math might be off a bit, though.
pirogue%20002_2.jpg

I was going to cut right where shortest edge of side touches stem with the new angle.
 

oldsparkey

Well-Known Member
Aug 25, 2003
10,479
123
Central , Florida
www.southernpaddler.com
The Uncle John Pirogue stem pieces are made for a 45 degree cut of the ends of the side boards. The outside of the ribs are also cut at an angle to fit flush with the side boards to create the rocker. One exception is the center rib the outside of it is at a 90 degrees with the rib or squared.
All of the center pieces ( ribs) across the bottom of the boat are at a 90 degrees so they sit flush with the bottom. To increase or decrease the amount of rocker is weather you increase or decrease the degrees of the cuts. This is why you can look at the study plans of his boats and can't make one from them , He left off/out the degree of the needed cuts to make them work on the study plans , you have to purchase the plans to get that information.

Same thing with the Bayou Skiff for it's ribs and the transom. ( That information has not been made public .. Yet but you can get it from here ) http://www.unclejohns.com/bysk14/

Chuck.
 

captaindoug

Well-Known Member
Nov 18, 2009
142
0
71
Tampa Bay, Florida
That alone was reason enough for me to buy two of Uncle John's kits, to save myself all the trial and error, and error, and error... trying to get all those angles correct. Well worth the money in my opinion. I am going to include an image to show why I am so impressed with the shallow draft of the pirogue. The other boat I run draws 14 to 15 ft, depending if we have the full 28,000 gals of fuel, 600 gals of oil, and 6000 gals of water aboard.
Gasparilla.jpg
 

oldsparkey

Well-Known Member
Aug 25, 2003
10,479
123
Central , Florida
www.southernpaddler.com
That sure is not a Pirogue by any stretch of the imagination , now I can see why you wanted a couple pirogues. Besides , your work boat can't be car topped of picked up by one person and worse of all ...... I could not see the 1st rod holder in that picture of her. :roll:

A shirt tail relative of mine use to work on a sea going tug with his father ( The Capt ) and between ports , in any free time , they would run a line behind the tug.... Yep , fishing while moving the goods.
Bobby said sometimes the fishing was really good and helped supplement the meals with fresh meat. He told me .. when you got a strike , you wished it was not a really big fish because the tug did not slow down. :lol:

The Tug Boat , the unsung hero of the water front and the weight lifters of the boat world.

Chuck.