Curved Stem | SouthernPaddler.com

Curved Stem

beekeeper

Well-Known Member
Mar 4, 2009
1,917
59
Keith and seedtick showed me how to make a curved stem piece on the bandsaw. After shapping on the saw, I hand plane them to fit the sides' angle as they are installed. My bandsaw is down so I wondered if I could make one without it. This is what I did:
Layed out and cut the curve and angle:


I mark mine with a 3/8" "face" down the center. This allows me to plane the edges of the sides flat and squared for attaching the batterboard:


Used the draw knife and a spokeshave to cut the 30 deg. angle usually made with the band saw:


Cut away excessive wood to reduce weight:


Complet, 6" on 8" curved stem:


beekeeper
 

FlaMike

Well-Known Member
Jun 20, 2007
624
2
Spring Hill, FL
www.ptponds.com
Beekeeper, you are RIGHT on time! :D

Although I'm still about a month away from starting a build, I was wondering how I could make the curved stem for a marsh style pirogue, as well at the tapered stem called for in Kieth's plans for his swamp pirogue. I considered renting a band saw for a day, but I knew it could be done without one.

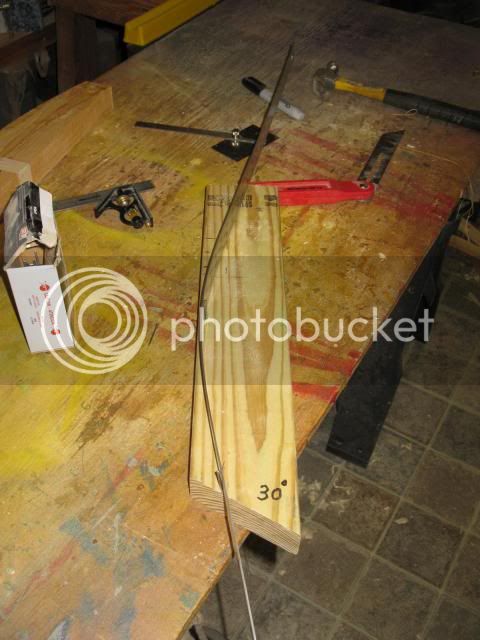
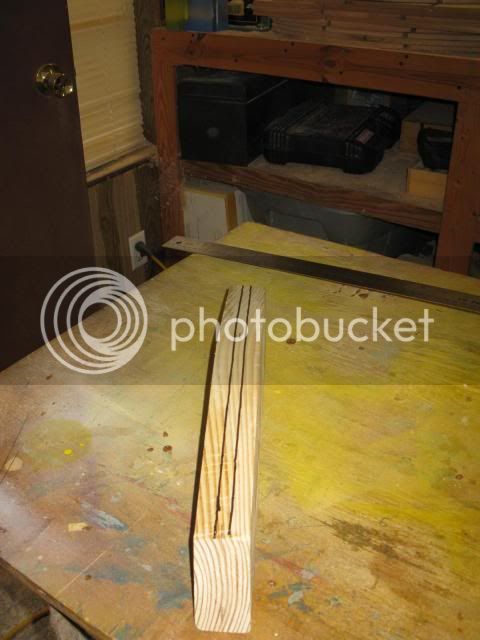
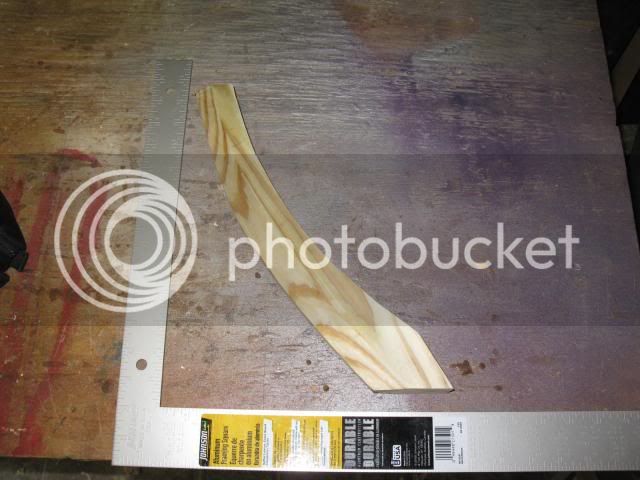
What I came up with starts out like your method, but after marking the front face of the curved stem, and then scribe a line on the sides of the stem where the cut would come out, I figured I'd connect the face line and side lines with a series of 
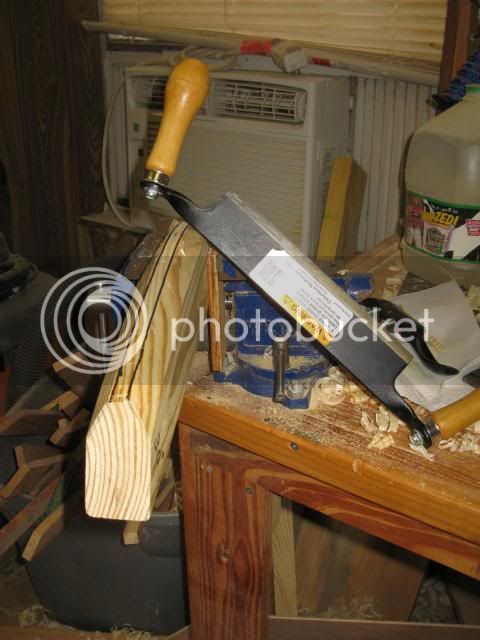
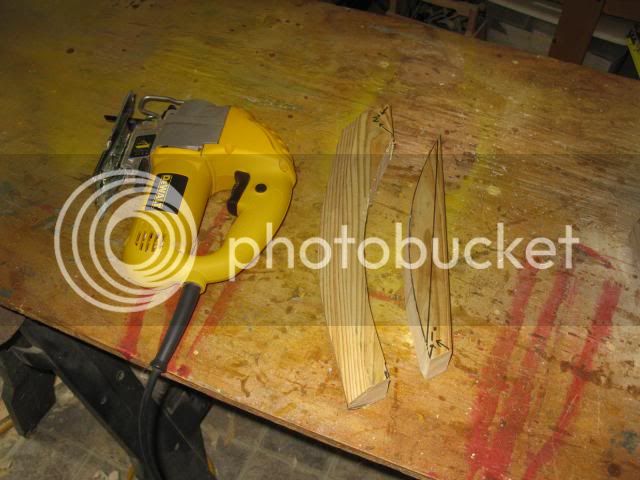
careful saw cuts. Then I'd use either a wood chisel or sharp hatchet to remove that wood, (not owning a adze,) and then finish up with either a plane or sander.

I've seen this method of wood shaping covered in several books on traditional boat building books, as well as watched it being done in a boat yard down in Tarpon Springs, where they were building plank-on-frame sponge boats.

As for the tapered stem called for in Keith's plans, I might be able to make the taper on the table saw, if I can get my Mk1Mod2 eyeballs working right. Otherwise, I'd go back to the above process.

What YOU have done is to clearly demonstrate that it IS something I can do, one way or the other, without a band saw. Thanks!

I do believe seedtick has said that sometimes he's used a larger piece of wood for the stem, rather than a 2X4, so he could trim off the part of the stem that "stands proud." Cutting that away on the smaller 2X4 might remove too much of the stem's strength. So maybe start out with a 4X4? (Could be cut down to a 3X4 or whatever would be workable.) Once shaped and the extra "proud" wood removed, it shouldn't add very much to the overall weight, I suspect.

Since you are posting about the boats ends, I'd like your opinion on the chines, inside chines for the marsh style, that is.

I have seen where it looks like seedtick attaches the chines to the sides first, then bends the sides on some forms and temporarily joins the sides and the ends, and at some point shapes the ends of the chines to allow the sides to fit together at the ends. Then the stems are place into position with the bottom of the stems sitting on top of the chines at the bottom.

What I was thinking of was to cut the stems longer than they will need to be, so they can be installed and then cut off flush with the bottom and top of the sides, with the chines either cut to be fitted flush with the stem, or maybe even notched into the stem. This would probably take some dry-fitting a couple of times before the final glue and nailing, but might be worth the trouble.

What do you think? (Or anyone else, for that matter.)

Mike S.
Spring Hill, FL
 

beekeeper

Well-Known Member
Mar 4, 2009
1,917
59
Most of my stems are made from a larger block of wood. See:
viewtopic.php?f=3&t=8404
They are cut and planed to fit flush with the sides for a neat and sealed look. Keith or seedtick know best for their boats, but for a plywood boat my understanding the main purpose of the stem piece is to have a place to nail the sides together. I think some builders use only a 3/4" board.
To reduce the weight of a boat one must pay attention to details and remove material where you can. It is true the extra wood in a full sized stem doesn't weigh much, so if it is not needed or wanted remove it.
I have seen chine logs notched into the stems. This calls for larger stems, and cutting notches or putting spacers between the plywood and stem. Fitting the chine logs together can be tricky to fit(for me) but I'm not sure how well they have to fit together. The stem sitting on top of them will hide any inperfections.
Not sure about fitting the logs to the back of the stem. It will be tricky to make the cut for the correct length and attach the chine logs to the sides after they are attached to the stem piece. Inside gunnels are fitted this way but they are a lot easier to bend than a chine log.
I suggest making the stems as Keith's plans call for. You can make them with hand tools as you described.

beekeeper
 

jdupre'

Well-Known Member
Sep 9, 2007
2,327
40
South Louisiana
FlaMike said:
I have seen where it looks like seedtick attaches the chines to the sides first, then bends the sides on some forms and temporarily joins the sides and the ends, and at some point shapes the ends of the chines to allow the sides to fit together at the ends. Then the stems are place into position with the bottom of the stems sitting on top of the chines at the bottom.

Mike S.
Spring Hill, FL

Mike, I've never tried it that way, but I think it's a bit more user friendly. You can bring the sides together with the semi-shaped chine ends and kerf the sides together. Just run a handsaw between the chine ends repeatedly and you can get a really close fit.

All kind of ways to build a pirogue. I was talking to a friend of mine that had a neighbor back in the 50's that started a pirogue by pounding a 2x4 into the ground at each end of the pirogue at the angle he wanted for the stems. Boat was built completely upside down. He fitted the chines to the stems held in place by the floor ribs. He then nailed on the sides and gunnels. Cut the stems off flush, nailed on the bottom and cut the tops of the stems off, freeing the boat from the ground. No two of his pirogues were alike , though. :)
 

FlaMike

Well-Known Member
Jun 20, 2007
624
2
Spring Hill, FL
www.ptponds.com
Thanks, guys! From what you've both said, I think I now have a much better idea of how to go about what I want to do. And as usual, I was "over-thinking" the problem. I guess what it comes down to is, "Stupid, Keep It Simple!" :D

I kind of like that! SKIS. Hmmmmm. . . Should be able to make a word of it. Be easy to remember that way. . .

Mike S.
Spring Hill, FL
 

beekeeper

Well-Known Member
Mar 4, 2009
1,917
59
Mike S.

I hope I have not confused the process. After rereading the post I need to clairify a couple points.
My stem angle was made to 30deg. but will be later planed to fit the side flair, which will be less. My angle is determined by the sides fit to the chine log and bottom, and the stem does not spread the sides. I think Keith's angle of the stem determines the sides flair angle, or may spread the sides. Build yours like he does and you want have a problem.
The curved stem I normally build is a combo of the tapered(swamp pirogue) and the curved(marsh) style. I get the stylish curved ends with the sealed "finished"(inside) look all in one. I start with a block 3+3/8" wide X 2+3/8" high. This is for a 30deg. setting on the band saw. You will have to experiment for other angles.

beekeeper
 

FlaMike

Well-Known Member
Jun 20, 2007
624
2
Spring Hill, FL
www.ptponds.com
No no, Mr. Keeper! You didn't add to my confusion, although that is easy enough to do, you clarified things for me.

But since you brought my confusion up. . . :D

I will continue to study all the pics I have of Friend Keith and Seedtick's builds, as well as yours and others posted on the Forum. But I think I do now have a good idea about how I will proceed. The obstacles that keep me from building will be resolved in the first week of the coming month. Then its just a matter of clearing the garage, getting the materials together, and off I'll go.

What confusion I still have is the fact that the two boats I want to build, the marsh pirogue from Seedtick's post and the swamp pirogue from Keith's plans, are rather different from the UJ pirogue I've already built. Although I have said before that I'd go with the marine ply on my future builds, I need to get the building process down for these, as well as decide just what length I really need them to be for my use in my location.

Now, I've decided to consider my next two builds to be "experimental." I will keep the cost way down by using non-marine plywood and oil based paint instead of full glass & epoxy inside and out. IF I Do use any glass cloth, it will be on the bottom only, because I know I won't be able to restrict myself to fresh water. The saltwater flats I'd eventually sneak into do have rocks, oysters and barnacles.

After building and using these two designs, both at 12 feet in length with 24 inch bottoms, I'll be able to decide if larger might be needed, or perhaps not. Then I can spend some time deciding just what I want to build next, using the better materials for something that will last, maybe as long as I will.

Mike S.
Spring Hill, FL
 

beekeeper

Well-Known Member
Mar 4, 2009
1,917
59
FlaMike said:
Now, I've decided to consider my next two builds to be "experimental." I will keep the cost way down by using non-marine plywood and oil based paint instead of full glass & epoxy inside and out. IF I Do use any glass cloth, it will be on the bottom only, because I know I won't be able to restrict myself to fresh water. The saltwater flats I'd eventually sneak into do have rocks, oysters and barnacles.

After building and using these two designs, both at 12 feet in length with 24 inch bottoms, I'll be able to decide if larger might be needed, or perhaps not. Then I can spend some time deciding just what I want to build next, using the better materials for something that will last, maybe as long as I will.

Mike S.
Spring Hill, FL

Joey and I have been talking about many of the ideas you are considering. I like your plan. This is food for thought only.
Consider doing only one boat at a time. If you build two 12' boats and discover 12' is wrong for you? The swamp pirogue has ribs and may be simplest to build, if you have built another boat with ribs befor. If your primary use will be in the marsh then start with it. There are reasons it is called a marsh pirogue. I would guess its design evovled because it is better suited for that enviroment. Seedtick or Keith would know.
Exterior pine plywood will work for a painted only boat. About $20 per boat more than Luan. It will weigh more, but much stronger and more water resistant. A 12' pirogue will be light enough for most times.
If there is the possability you will want fiberglass added later, you could saturate the outside with epoxy instead of paint until you knew for sure. I doubt if epoxy/fiberglass would do well over oil based paint. If you decided not to glass you could paint over the epoxy saturation coat.
Glassing only the bottom(assuming you will at least go over the sides and cover the floor/side joint) = For me it is easier to glass over the sides and bottom all at one time. That way I don't have to "feather" the glass down to the wood along the edges. Just drape the cloth over the whole boat and after the epoxy drys trim it off at the top of the sides.

beekeeper
 

beekeeper

Well-Known Member
Mar 4, 2009
1,917
59
jdupre' said:
Kayak Jack said:
OMG - Joey now has competition in the " 'Sperimentin" stuff! :|


Yeah, Jack, FlaMike is my kind of guy. 8)

Joey

:wink: If he ever builds a "Sperimental" boat he will be hooked. I'm on about my 10th. or 12th. one. :D Joey, how many for you?
"Sperimentin" only creates more questions.

beekeeper
 

FlaMike

Well-Known Member
Jun 20, 2007
624
2
Spring Hill, FL
www.ptponds.com
For me, the build just just as important as enjoying the results of the building. And better yet, is the learing along the way.

I know that my learning is not going to add to the existing knowledge base, or advance the hobby, (if you want to call it that.) In fact, the way most of the builds are being done by people on this Forum and on JEM's, will likely be the "new traditional" small boat building method one of these days.

As much as I like that type of building, wood/epoxy/fiberglass composit, my real interest lies more in the past. I guess that's where I'm heading with my "experimental" building. Kind of "retro."

I won't be building both versions of a pirogue at the same time, but one after the other. Not sure which I'll start with, but it will be a 12 footer, for several reasons. The second may be the same, or if the first seems just way too small, it will likely be a 14 foot boat. I've built the UJ pirogue at 15ft (+) and found that the extra lenght (and weight) was more than I needed, or wanted to deal with. Looking for a happy medium.

Man! Can I highjack a thread, or what! :lol:

Mike S.
Spring Hill, FL
 

beekeeper

Well-Known Member
Mar 4, 2009
1,917
59
FlaMike said:
For me, the build just just as important as enjoying the results of the building. And better yet, is the learing along the way.

...................... will likely be the "new traditional" small boat building method one of these days.

As much as I like that type of building, wood/epoxy/fiberglass composit, my real interest lies more in the past. I guess that's where I'm heading with my "experimental" building. Kind of "retro."

Man! Can I highjack a thread, or what! :lol:

Mike S.
Spring Hill, FL


Mike is now "my kind of guy".
:wink: I think Joey has been sharing our private messages. :roll: Boat building has evolved into fiberglass and epoxy. Most evolution occurs to meet conditions of the present. Pirogues were once a work platform, paddled short distances, stored in the water made from rot resistant cypress. Now it is a pleasure craft, transported to the water(needs to be lighter), touring boat(hence the evolution to the double paddle) and stand alone wood(rot resistant) is hard to find. I think a big factor in the evolution to glass/epoxy boats is the time and the different skills needed to build a tradtional build. It takes more time to do and more time to learn how. Tool(hand or machine) investment is also a factor.
I'm old so I like old. For me the transporting(light and handy) is the hardest change to overcome and maintain the old style build. Not impossible but hard.

You have not hijacked the thread. The thread is about a curved stem piece made with a draw knife, not more traditional than that. It is also an example of evolving. I cut the excess wood away to save weight. That probably would not have been done on a boat that was transported to the water one time in its life.

beekeeper
 

beekeeper

Well-Known Member
Mar 4, 2009
1,917
59
Had a question about this, so I'm posting new pictures.
Mark the board to the desired curve.
IMG_2951.JPG

Cut the shape.
IMG_2953.JPG

Mark the angles on each end and rough cut to the line.
IMG_2956.JPG

Finish with hand plane or sander.
IMG_2957.JPG

Remove excess wood.
IMG_2959.JPG
 

beekeeper

Well-Known Member
Mar 4, 2009
1,917
59
Is this cutting into wood that is too heavy for a coping saw?

Not sure I have enough experience with a coping saw to answer your question.
It may work cutting the curve on the back side. The one I cut with the jig saw.
My guess is a coping saw would have trouble following the center line at the angle of the cuts on the face of the stem. I know my band saw works better with its 1/2" blade than the 3/8" one. If finishing everything with the plane or spokshave , the coping saw may do for rough cutting the angles. The draw knife made fast work of this and left little wood to be finished with the plane. Not saying it won't work just not my first choice. Maybe I should try it.
Any coping saw users out there?
 

beekeeper

Well-Known Member
Mar 4, 2009
1,917
59
I belive Joey's last two boats have had curved stems. He has joined the side panels together with fiberglass and epoxy to reduce weight and the extra work needed to make wood ones. Most times I have built mine using a generous amount of wood, mainly because I like the stem pieces to fit flush with the sides.
Agreeing that saving weight is a good thing these are my new stems. They are very light and were no harder to make than the larger ones.
Cut two 1" X 3" cedar boards to match the curve.
IMG_5313.JPG


Cut away excess and it makes for a flush fit.
IMG_5316.JPG

IMG_5315.JPG

IMG_5332.JPG
 

jdupre'

Well-Known Member
Sep 9, 2007
2,327
40
South Louisiana
Chuck, that's the problem I saw in doing a stem piece. Not that it couldn't be done. It's just that there's a LOT a geometry figuring that goes into that 5 or 6 inch transition section. I like a simple, gentle curve there. Simple to look at, but not necessarily simple to do.