Glassing the bottom? | SouthernPaddler.com

Glassing the bottom?

stevesteve

Well-Known Member
Sep 5, 2006
111
0
UK
Of the boat not personally of course although it would save on seating :lol:

I have nearly cleared enough space to get a pirogue into our garage and I'm trying to get my head around all the techniques before getting into it.

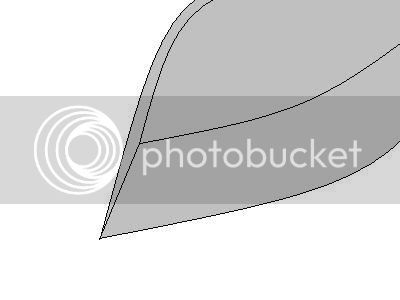
was wondering how you get the glass mat smooth over the bow when glassing the bottom. A couple of pics to explain (in glorious MS Paint):

Up-ended boat hull
pirglas1.jpg


Then with the glass draped over it
pirglas2.jpg


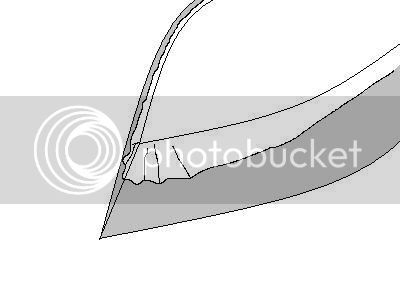
What do you do about those wrinkles? Do they just smooth out or do you cut darts and overlap them?
 

oldsparkey

Well-Known Member
Aug 25, 2003
10,479
123
Central , Florida
www.southernpaddler.com
I do the bottom and the sides starting in the middle of the boat and working towards the ends.
Then when working close to the bow or stern, I pull the lose glass, very , very easily, out from the bow or stern and trim it with some scissors .... Then over lap it and epoxy it.

Everyone has a different way of doing it, it is just what ever method works for them.

Chuck.
 

stevesteve

Well-Known Member
Sep 5, 2006
111
0
UK
Ah... I am glad to hear that. I had visions of it magically having to be squished into placed and wasn't sure how to do that.

I could only see it being possible if it was cut and overlapped, which is what folk seem to be doing so that feels better.
 

Eichhornia

Active Member
Sep 22, 2006
32
0
Florida
Are we going to play that game where no one tells him about glassing the inside and how much, "fun," that is?
Poor stevesteve thinks the OUTSIDE is hard to fit...HA!
 

stevesteve

Well-Known Member
Sep 5, 2006
111
0
UK
Would you all fully glass the inside of a pirogue?

I was thinking of 4" (10cm) tape on the inside seams and glass over the whole bottom (say 4" up the sides too). This was based on using 1/4" (6mm) ply.
 

hairymick

Well-Known Member
Dec 8, 2005
2,107
2
Queensland, Australia
Hi Steve,

I would too. :D It will increase the overall strength of the boat and also give much better protection to your wood. It is a bit more work but well worth it in the long run IMHO.
 

Bullhead

Well-Known Member
Mar 27, 2005
172
0
Indiana
Hahaha, they never told me about the overlap thing on the sides and the problems of the inside.... but I know now. All it cost me was alot of cleanup on my sissors and some words I won't repeat...LOL.
 

stevesteve

Well-Known Member
Sep 5, 2006
111
0
UK
Just about to do the glassing... Matt et al. any last words?

Hi everyone,
Despite having first asked about glassing in September, I have finally reached the stage of actually doing it :oops:

Any last words? I know Matt suggested doing it in three sections. Is that front/middle/back with an overlap?

I saw someone on another site suggesting two halves along the length, one side at a time. Im a noobie at this game!

Also, do I need to let the saturation coat go off first or should I do it while it is just in its gel stage?
 

JEM

Well-Known Member
It can be done all at once. It's just a little tough if it's your first time.

I'd measure out you epoxy (resin and hardener in separate cups) and have some waiting unmixed as you work on laying the cloth. Then you'll have time to do the entite bottom at once. Mix more as you need it. if you can get someone to assist you, that will work even better.
 

Kayak Jack

Well-Known Member
Aug 26, 2003
13,976
171
86
Okemos / East Lansing Michigan
Steve,

Let gravity work FOR you, not against you. Avoid splitting the glass along the keel line; that would be a large, unnecessary, hemorrhoidal pain.

Split the glass across the boat (athwart, in nauticalese) in either two or three sections. On the stem end, have enough so that it will extend to the end of the boat, plus maybe an inch. It should drape down below BOTH gunnels an inch or two.

Put in a few push pins along the keel line just to hold the glass in place temporarily. Pull out on the glass at the bow into a tent with its ridge line an extension forward of the keel line. With scissors, cut back to where it touches the boat. Overlap the two pieces over the bow, and push pin it into place.

Snip and tuck to get rid of wrinkles. Stand back and admire your handiwork. Take a deep breath, and start mopping epoxy on, and squeegeeing much of it off. You are working here to fill the weave; the first coat is a good start at it. More coats, and eventually some spot work, will be required.

After the first coat sets a few hours, the glass hanging down over the gunnels can be easily sliced off with a razor knife. So can little fingers, so keep it away from the kids?

Successive coats should be applied within 2-3 days to achieve a chemical bond. Otherwise, you want to roughen the surface so the new epoxy can get a foothold.
 

oldsparkey

Well-Known Member
Aug 25, 2003
10,479
123
Central , Florida
www.southernpaddler.com
I do it all at one time. Saturate the boat , let it sit for a day then lightly sand it. Put the glass over the boat , center the glass and start at the center working towards the ends.

When the bottom is done I move to the sides , again starting in the middle and working to the ends.

When the sides are done I tackle the bow and stern sections by epoxying the glass on one side , trimming it and then doing the other overlapping the bow and stern pieces.

Let what is hanging down hang for an hour or so and then trim it with a razor knife along the underside of the outside rub rail.
When everything is set (usually the next day I brush on some epoxy along the underside of the rub rail to seal it and any light cuts into the wood if I was not careful when trimming the glass.

Chuck.
 

Kayak Jack

Well-Known Member
Aug 26, 2003
13,976
171
86
Okemos / East Lansing Michigan
Steve2,

When trimming those edges off the gunnels, be a bit careful. some of the edges of fiberglass have single strands on. When epoxy hardens on them, they become little needles. OUCH!

(Chuckie told me this. I never did it myself.)
 

hairymick

Well-Known Member
Dec 8, 2005
2,107
2
Queensland, Australia
Have you got a good squeegie?

I got mine from an art & craft shop (Actually I got several) They are only a couple of bucks each.

They have a blade a bit like a windscreen wiper blade mounted in a plastic handle. They are brilliant for wiping out the resin runs without removing to much resin from the weave.

I also cut one in half for the fiddly bits.

A tip, after you are finished using it, wipe the resin off the blade with a rag. if the resin dries there, your squeegie is useless. there will be little ridges in the blade that will leave marks in the resin.

Will take a couple of piccies today