Not tiny house..........tiny boat | SouthernPaddler.com

Not tiny house..........tiny boat

jdupre'

Well-Known Member
Sep 9, 2007
2,327
40
South Louisiana
It's been a couple of years since I built a boat. I needed something to throw in the back of the truck and fish close in to the different local landings. This is what I came up with.


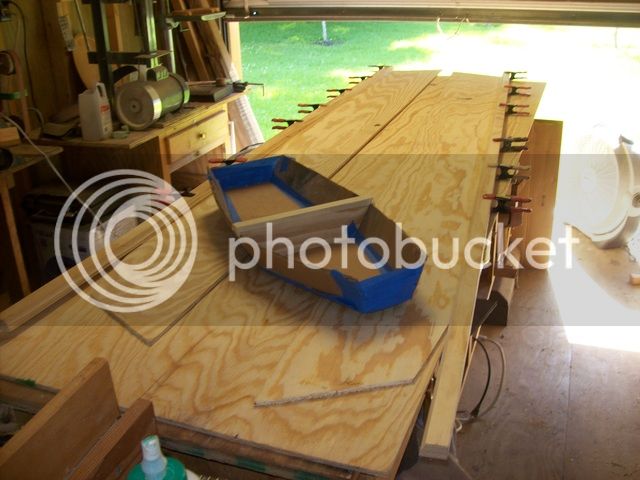
One 4x8 sheet of 1/4" sanded pine plywood.......plus a few scraps for the stems. The really crude model is all it took to give me a place to start.


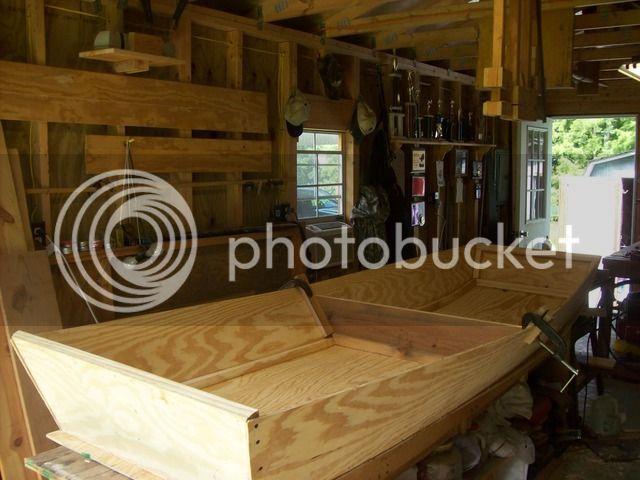
So far, I'm into the boat for about $38.00 and about 8 hours labor. That's counting making the model and building the center form. The chines didn't bend to the arc of the sides so I had to waste time piecing them in.

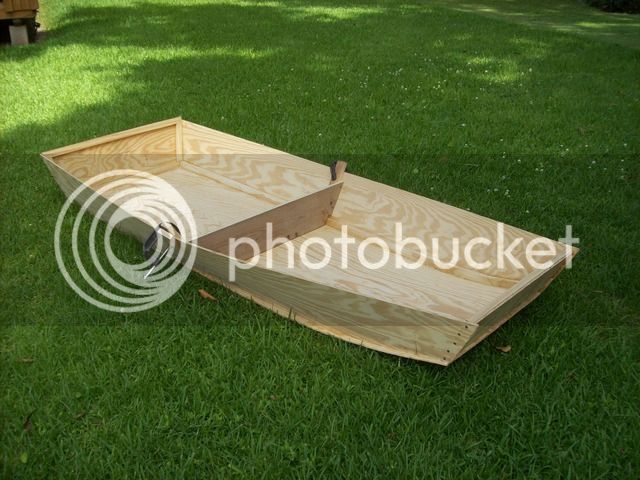
I re-viewed Fla Mike's Pit Pan video. Similar sized boat and I noticed it hardly sank down when he got into his boat. I figure this one ought to have plenty enough flotation.

I read that a sheet of 1/4' pine ply weighs about 22lbs. I figure with the gunnels, ribs and deck(s), it'll come out under 30 lbs. Cool!

It won't be a great paddler, but I won't be going very far anyway.
 

oldsparkey

Well-Known Member
Aug 25, 2003
10,479
123
Central , Florida
www.southernpaddler.com
Yep ....that's a Pit Pan or a Sneak Boat ( depends on which old timer you talk to ) that the locals use to make for Gator hunting and later for Duck Hunting.
Totch Brown in Everglades City made them famous by using them for gator hunting. Both when it was legal and even when it was Illegal. That's back in the early Florida days when the Everglades National park was not in existence and then after it was formed.
The normal form of propulsion was being poled to get from one spot to another since it was shallow water boat.
I believe you will find it one very useful boat.
 

Kayak Jack

Well-Known Member
Aug 26, 2003
13,976
171
86
Okemos / East Lansing Michigan
Off the wall idea: Mark around the whole boat about 10" off of center. Cut the boat into two sections at that line, one section being about 60% of the boat, and the other section being about 40%.
Install ends in each section yeilding two, partial boats. Temporarily fasten the two sections into one boat when you go fishing. To carry the boat, unfasten the two sections. Load the longer section into your pickemup truck. Slide the shorter section into the longer section.
This gives a boat that (1.) loads and unloads easier, and (2.) stores easier.

I told you it was off the wall.
 

jdupre'

Well-Known Member
Sep 9, 2007
2,327
40
South Louisiana
Sounds like a good idea, Jack. This boat being only 8 ft long, should fit in the truck pretty handily. Dang fine idea for someone with an SUV that can't fit much of a boat inside.
 

Kayak Jack

Well-Known Member
Aug 26, 2003
13,976
171
86
Okemos / East Lansing Michigan
I actually saw the idea originally in the Canadian Bush Plane Museum, in Saulte Saint Marie, Ontario. They had a canoe (about a 16 footer) cut into 3 pieces for carrying in an aircraft. The mid-section, about 7' but not centered. The stem ends were different lengths - about 5.5' and 3.5'. That way, the shortest section nested inside the next shortest section, and both nested inside the mid-section.

Careful measuring is needed. Also, the boat did not have full bulkheads at the junctions. Rather, it had a 2" wooden rim inside as mating surfaces for the three sections. Swivel bolts mounted in both ends of the center-section poked through mating holes in the adjacent rim, and fastened with large washer and wing nuts. Two beads of silicome sealannt ran around the faces of the rims. Tightening the bolts fastened the three sections together, and squished the sealant for water tightness.

They did say that this canoe was to be used on lakes and class I rivers only, NO RAPIDS.
 

Kayak Jack

Well-Known Member
Aug 26, 2003
13,976
171
86
Okemos / East Lansing Michigan
There are many possible combinations. Some are possibly very specialized. All interesting.

I suppose that different sections of different boats could fit together? Kind of an assortment of various designs that still match when fitted together, but form boats of longer or shorter lengths, different rocker, even different colors and materials. Some combinations are paddled, some sailed, and one for a small outboard.

There ya go, Matt! A mix and match line of boats.
 

jdupre'

Well-Known Member
Sep 9, 2007
2,327
40
South Louisiana
Well, the 30 lb weight I had figured on got shot all to he!!. I went by my last pirogue on which I used Western Red Cedar for the chines and gunnels. I used what I had on hand for this boat, which was white pine and poplar. The weight of 50+ feet of 1 x 2 material really adds up. Stronger but a little heavier. She'll probably end up around 40 lbs. Still a handy, manageable weight.

Chines and gunnels are all in. I filled the screws holes and did a BUNCH of scraping and sanding. She's looking so good, I'm going to go with a clear finish with the outside bottom painted green for 2 1/2" up the sides.

I learn ( or re-learn) something with every boat build.

1. clean glue drips BEFORE they dry! Big time saver.
2. a sharp scraper is MUCH better for erasing small flaws and factory ink markings than sandpaper. I truly would give up my palm sander in favor of a good scraper.
3. I ignore this, but it's probably a better idea to follow some sort of plans. I like to design on the fly, but it does take twice as long or more that way.
4. After the rough sanding with a belt sander and palm sander, I've come to favor final hand sanding with the 7x Norton 220 gr sandpaper with a light touch. I can go over the entire boat with a quarter sheet of this amazing product. Emphasis on the light touch. If you find yourself pressing hard, pull out the scraper or the 120 gr. It took a long time to get that into my thick
skull.
5. Sanded pine plywood is as good as , or a better product than fir marine ply. Sacrilege you say!! I've used it on 3 boats and still have a non-painted model boat in the weather doing very well after 3 years.
The model looks almost as good as the marine ply on my first pirogue did under 3 coats of paint that was kept inside.
6. No matter what they say, I haven't found screws that will CONSISTENTLY countersink themselves. I'd rather use screws than nails on a light boat because they're faster, hold better and don't bounce
the light boat around like pounding nails does. I just go back after the glue dries and remove, countersink and replace the offending screws.
 

oldsparkey

Well-Known Member
Aug 25, 2003
10,479
123
Central , Florida
www.southernpaddler.com
" I'd rather use screws than nails on a light boat because they're faster, hold better and don't bounce
the light boat around like pounding nails does. I just go back after the glue dries and remove, countersink and replace the offending screws.
"

I am with you on that , screws are a lot better and the best thing is you can remove them. All the boats I have made you will not find any metal in them since I remove all the screws and fill in the holes. Same goes for the stitching holes and copper wire used to hold the panels together.

Chuck............
 

jdupre'

Well-Known Member
Sep 9, 2007
2,327
40
South Louisiana
I'm going to try something different for a finish this time. To get a finish that really seals the wood, you have to put on multiple coats of quality varnish. That's good UNTIL the wood checks and splits (and it will) . Then, what you have is a mostly sealed surface that doesn't allow water to evaporate back out. I'm going to put a lighter coating of paint and probably a danish-oil type of clear coat.........kept thin to allow water free passage in ( only 5 or 6 hours at a time) and free passage out ( weeks of drying in between uses) . I have a wooden knife handle that sees almost daily use and washing, that we got for a wedding present 30 years ago. Once clean and dried, it looks pretty much like the day we got it. I'll forgo the concours quality finish to test this theory.
 
Last edited:

jdupre'

Well-Known Member
Sep 9, 2007
2,327
40
South Louisiana
No turning back now. I just put on one coat of the Danish oil concoction on the outside bare wood. It's a pretty common mix........equal parts varnish, boiled linseed oil and mineral spirits. I just flooded the surface and wiped it in with a rag. No brush, brush strokes or runs to worry about. It brought out the color a bit, but it doesn't leave a film on the surface. I'll put on two or three or more coats. No sanding between coats. It's basically the same formula as a deck stain but without the stain. When it needs freshening up, a good cleaning and drying and I'll apply another coat or two. It should never crack or flake off. It doesn't leave that wonderful glass smooth surface of a fine varnish job. You still feel the wood grain. We'll see. No guarantee with experiments, eh, boys?!


texastom

Well-Known Member
Jul 29, 2013
184
4
Dallas
Looks good. Did you cut the extension off the bottom? The pic 2nd above shows the bottom extended past the transom. Pic in post 13 shows the "tail"
 

jdupre'

Well-Known Member
Sep 9, 2007
2,327
40
South Louisiana
No , Tex, Ididn't cut the bottom extension off. The pic with the Danish oil finish is from the bow looking back towards the stern.

Bottom extension: Just a hunch, but I'm thinking the extension at the stern MAY help lessen the turbulence of the flat stern. Like with many of my designs...........we'll see. :D
 

jdupre'

Well-Known Member
Sep 9, 2007
2,327
40
South Louisiana
Jack, I don't plan on it seeing any weather other than when I'm using it. I figure to use it for the day, clean and dry it out and store it in my shed. I don't expect it to stay in "like new" condition. I figure it's like a shovel or ax handle. Use it and then put it away. Sure, if you leave a shovel out in the rain and sun for six months, the handle will be in sorry shape. If you dig in the mud, hose it down and put it away dry, the shovel should serve you for 15-20 years.

There is varnish and boiled linseed oil in the mix...........the oil, along with the mineral spirits, allows the varnish to absorb deeper into the wood. So, there IS protection, but it's below the surface.

Some day I may spend $100 a gallon for the finest spar varnish and spend a month applying 10 coats of it with plenty of sanding in between. I don't foresee that in my immediate future, though. :D