UJ Pirogue - raising the sides... | SouthernPaddler.com

UJ Pirogue - raising the sides...

stevesteve

Well-Known Member
Sep 5, 2006
111
0
UK
Morning/Evening All (pick your own timezone!)

I was wondering how many folk have raised the sides of their UJ Pirogues by an inch as it should be possible to get 11" sides and the standard width bottom board out of a 48" sheet.

How have you handled the join between the ribs and the side boards?

I was thinking about something like this (no it's not CAD it's MSPaint!)

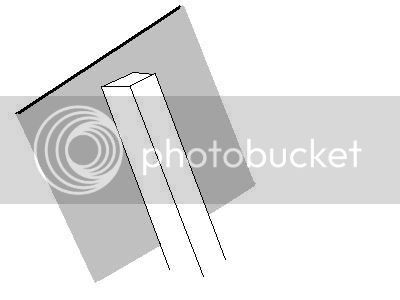
Section of side boards with rib. Note the 10" rail is short of the top the side board:
section1.jpg


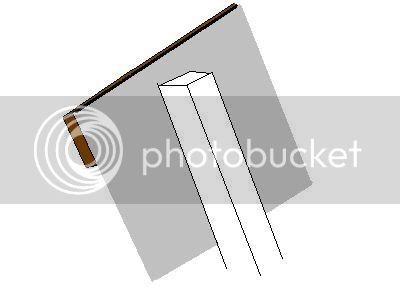
Outer rub-rail added:
section2.jpg


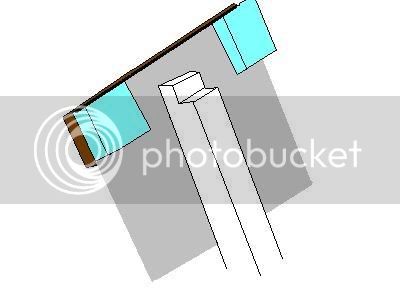
Inner spacers added and rib cut to fit inner rail:
section3.jpg


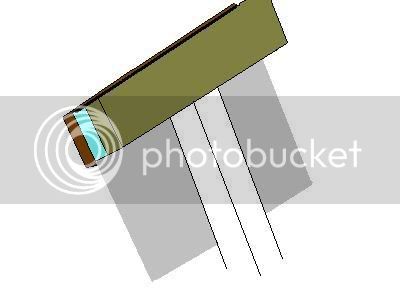
Inner rail added over the rib:
section4.jpg


Does that look OK?
If anyone has built an UJ Pirogue with 11" sides how did you do it?
 

oldsparkey

Well-Known Member
Aug 25, 2003
10,479
123
Central , Florida
www.southernpaddler.com
stevesteve said:
Morning/Evening All (pick your own timezone!)

I was wondering how many folk have raised the sides of their UJ Pirogues by an inch as it should be possible to get 11" sides and the standard width bottom board out of a 48" sheet.

How have you handled the join between the ribs and the side boards?

I raised one and did it just the way you have it diagrammed.

The joint between the ribs and the sides is the same as with the bottom. It is a two step process ... The SIDES are attached 1st then when they are done the Bottom is attached.

I put them in place then mark both sides where they will be with a lead pencil. Remove them and drill two small holes in the sides put the rib back in place and holding the rib between the lines then drill from the outside into the rib, (Don't drill into your hand. ) now run a screw in there to hold it, do this all the way around.

Here comes the fun part....... Take all of them out or have them really loose so you can run some epoxy where they will be attached. it is easier to take them out.

Epoxy the area in the boat where they will be, epoxy the side of them that will contact the boat, put the ribs back in the boat and put the screws back in the holes to hold the ribs. Let them set up and when everything is cured, remove the screws and fill in the holes with some epoxy and wood flour.

"O" I almost forgot........ 1st the outside rub rail will be epoxyed to the boat since the bottom is not on it and if you try to pick it up by yourself the sides will buckle breaking one or more of the ribs in the boat. That is not a good thing to have happen.

pirogue%20009.jpg


Same process for attaching the bottom , start in the center and work to the ends.
***********************************************************
Next step ... filleting the seams....

Then paint some more epoxy (about 2 inches out from each seam in the boat. Let that cure and when it has, lightly sand it and then put down some masking tape, the distance out from the ribs and from the center of the side seams that you would want the fillet to be ...... Mix up epoxy and wood flour, some glass bubbles in there helps also.... Put in the fillet and get it as smooth as you can .... Hold off for an hour or till the fillet starts to dry and then pull the masking tape, You will have some nice filets with crisp edges and not a lot of sanding.

DON'T FORGET TO PULL THE TAPE BEFORE THE EPOXY CURES ALL THE WAY.

The fillets will or should look like they do in this picture ... they are the two light colored lines along the seams of this boat I am in the process of building :D

freedom%20026.jpg
 

JEM

Well-Known Member
Your idea look sound enough.

I'm a little familiar with Uncle John's method. Don't you have to cut the boards straight and then bend into place? So i'm guessing you'll have to cut the straight sides a little higher.

Chuck can offer more/better advice.
 

oldsparkey

Well-Known Member
Aug 25, 2003
10,479
123
Central , Florida
www.southernpaddler.com
All you do is to cut out the height you want the side boards and then install them, the item that controls the degree of rocker are the outside edges of the ribs (the angle of the ribs and the end pieces ).

NOT the upright angle of the ribs the outside angle of the flat surface of the ribs ... look at then and you will see that the bow and stern upright parts of the ribs are trimmed at an angle while the uprights of the center rib are at 90 degrees to there sides.

This is why I attach the sides to the ribs before I attach the bottom on the boat.

Chuck.
 

stevesteve

Well-Known Member
Sep 5, 2006
111
0
UK
Thanks Chuck,

if you try to pick it up by yourself the sides will buckle breaking one or more of the ribs in the boat. That is not a good thing to have happen.

No... not a good day out! That is pretty much the process that I had planned but I like the tip with the tape.

Mick suggested raising the sides, which was interesting as I had already worked out that I could go to 11" myself. It is nice to know others have done the same to get a little more freeboard.
 

seedtick

Well-Known Member
Jul 22, 2006
1,161
7
Denham Springs, LA
Why not just cut of the top of the rib completely, glue the inner rail directly to the side and avoid messing with the spacers?

Having a space between the top rails doesn't add any strength to the boat but it does create a slot that's more difficult to varnish/paint and keep clean. Why the spacers?
 

oldsparkey

Well-Known Member
Aug 25, 2003
10,479
123
Central , Florida
www.southernpaddler.com
seedtick said:
Having a space between the top rails doesn't add any strength to the boat but it does create a slot that's more difficult to varnish/paint and keep clean. Why the spacers?


I do it for two reasons one is practical and the other is vanity.

1... The inside rail when it has the spacers behind it make the boat look hand (custorm) built and not something from a factory ... besides I just like the looks of them.

2... The space between the hull and the inside railing when you use the spacers does offer a person a lot of options as far as tying down items in the boat, you can run a lone thru them and over your gear. Attach a cover if you are in bad weather, or even hang your water bottle from.
I have a holder for my water bottle and it has a Velcro strap on it, slip the strap thru a space and attach it to the side of the holder, my water bottle is right there for me all of the time.

Chuck.
 

Kayak Jack

Well-Known Member
Aug 26, 2003
13,976
171
86
Okemos / East Lansing Michigan
A gunnel ventilated with spacers on the inside is also easier to drain water from the boat. (THAT'S the real reason Chuck uses them.)

Like Chuck, I lace in my camp gear. I even made some wooden triangles (actually, some of my spacers for the gunnel) and drilled holes through them I glued these to the floor of the canoe and use them as cargo tie-town points.

I've read about boats tipping over, and want to be prepared should it ever happen to me.
 

stevesteve

Well-Known Member
Sep 5, 2006
111
0
UK
Hi Seedtick,

Initially I was thinking the same but then I just liked the aesthetics.
Here is a pretty one in a wood finish:
http://www.unclejohns.com/boat/feagans/default.htm
and one in a white paintd finish:
http://www.unclejohns.com/boat/photos.htm
Then I read about the possibilities for tie-downs and also sailing rigs which are easier to fit with the ventilated rails. The clincher came when I read about the ease of emptying water out... sounds like a very sound reason.

As to the strength, someone (maybe Matt?) suggested that actually the ventilated inrail acts as a box girder, giving a strength similar to a solid rail with the thickness of the ventilated one.
 

Kayak Jack

Well-Known Member
Aug 26, 2003
13,976
171
86
Okemos / East Lansing Michigan
Steve, and would you believe that we were once told that no one wants to build a boat of wood? Let alone have to paddle one!

My ventilated gunnels are a box beam. Spacers are 45-45-90 triangles with the hypotenuse along top and bottom edges. Each triangle has a large hole drilled through for lightening effect. (Yeah, I know, it's foolish - but so am I.) My spacers are in two rows, one parallel to the bottom of the inside strip of 1/8" plywood, the other parallel to the upper edge.

The 90 degree point of the spacers ends somewhere in the middle of the plywood strip. This is a very stiff structure. I originally thought the boat would not need thwarts; I've since learned that idea was pure horse pucky. I'm adding two tharts. (sigh)
 

stevesteve

Well-Known Member
Sep 5, 2006
111
0
UK
we were once told that no one wants to build a boat of wood? Let alone have to paddle one!

Quite right too Jack.
Imagine having to spend hours making your own boat out of that old-fashioned wood stuff.
Then imagine the tiresomeness of having to paddle yourself out and sit with the mellow sunlight glinting gently on the warm golden grain of your boat, as you sip a beer waiting for the rod tip to dip.
No I'm sure they are right... nobody would want to do that.

And Chuck,
What a beauty. That's what I would like to end up with. How does she behave under sail?
 

stevesteve

Well-Known Member
Sep 5, 2006
111
0
UK
I fancy trying that. I'll make it Project Phase II

Just for now it is 23:00 and it has spent the whole weekend raining. So I am consoling myself with a 12yr old Jameson Irish 'Distillery Reserve'.

G'night.
 

seedtick

Well-Known Member
Jul 22, 2006
1,161
7
Denham Springs, LA
This is kind of off thread, but if you have the ability to add an inch to each side, why not leave the sides alone and add two inches to the bottom width?

It'll give you more capacity and stability
 

hairymick

Well-Known Member
Dec 8, 2005
2,107
2
Queensland, Australia
Hi Seedtick,

I wouldn't presume to answer for Steve, but I suspect his thinking on this might be similar to mine.

So, here are my thoughts :twisted:

I HATE WIDE, SLOW, HARD TO PADDLE BOATS :D I just love long skinny ones that are not only quicker & easier to paddle but much more pleasing to the eye. (my eye anyway)

The U.J. pirogue is a beautiful little boat just as it is. When I was building the one at my work, we played around with widths etc and even by making it an inch wider, took a lot away from its sleek lines.
 

stevesteve

Well-Known Member
Sep 5, 2006
111
0
UK
Jack,
Yessir GMT, Zulu or currently BST for a week or so.

Mick,
Quite so. I like the look of the proportions of the UJ Pirogue as it stands and for the first build I'm going by-the-book (ok apart from the raised sides). Second or third version I might try varying it a bit but I want to be able to transport two of them fairly easily (car topped). Besides that as you change the width it alters the rocker and so you need to rethink several other aspects of the design at once.
Easy paddling, easy fishing.
 

seedtick

Well-Known Member
Jul 22, 2006
1,161
7
Denham Springs, LA
Beauty is indeed in the eye of the beholder, as is proportion and utility. Here's three different pirogues as an illustration.

ec5d77fb.jpg


ec5d77d8.jpg


ec5d77ae.jpg


We should all build what we like, just don't be afraid to build "outside the box". Few people stop at just one build and the future ones improve on the previous ones
 

stevesteve

Well-Known Member
Sep 5, 2006
111
0
UK
Hey Seedtick,

That's a fine flotilla you have there. Once the first couple are done I can start trying to vary the various dimensions and see where it leads me to.