Grandson Mikes "17 lb pirogue"
It's become a tradition with our Grand kids if they want to build a pirogue, 10 is the magic age. After that---- just work it out with parents and Grandpa and you're good to go. Mike is one of our several Louisiana grand kids,and is a student at the Shreveport Education Center for Autism. Mike had become very fond of one of our "herb lite" aka 17 lb pirogues, so when he turned 10, his heart was set on a aluminum SOF instead of the standard Uncle Johns Pirogue. About 2 years ago he and I set out to build his boat. The distance between Mike and ,I coupled with some old people ailments stretched the build time, but not our enthusiasm. The build started in La, moved to Texas, then to Kansas, but it's done now! I am so proud of Mike, he stayed enthused, closely followed directions, and completed the boat with very little hands on help from me.
This isn't so much a detailed "how to build post", but also about our journey together, I wouldn't trade it for the world.
We decided on a cedar strip/ fiberglass bottom, as the luan bottoms on previous builds didn't wear well. Recycled cedar fence boards for the bottom, a new cedar 2" x 6 x 14' for the frame, and a 25' roll of 12" aluminum trim coil, took care of the basic materials.
First step was to build a table. Sawhorses, 2x4's and plywood.

The cedar 2x6 was ripped to 3/4 x 1 1/2 about 14 feet long. These were laid out in the ladder shape for the framework with 45 degree slope a the ends. Total frame length of 12' so the 25' of aluminum fit with one foot left over. The cross pieces of the frame were glued in place with epoxy/wood flour mix and secured with T 50 stables for clamping.

The stems (end pieces of the frame ) were trimmed. A thick bead of epoxy mix was placed on the outside of the frames and the pre trimmed to shape aluminum was stapled in place over the wet epoxy mix.

While that set up we moved on the assembling the cedar bottom. The fence pickets were ripped into strips and planned to 1/4" thickness. The ends of the strips were cut at 45 degrees across the wide side for joining (scarfing) the bottom to length. A sheet of plastic drop cloth was placed over a rough pattern of the bottom shape, them the strips were glued together and clamped in place by shooting brads through 1' X 1' sticks. The sticks are covered with packing tape to keep them from sticking to the glue. We used tight bond III for this step.

After the glue was set we removed the sticks and brads, and sanded the rough shaped bottom, and gave it a "saturation" coat of epoxy.

The bottom was then covered with fiber glass cloth and wet out with epoxy. The excess cloth on the edges was trimmed.
 .
.
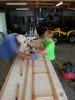
Now that we had the major components, it was time to put the boat together. The sides were bent around two forms, one of the forms was shaped to represent the transom and a wider form near the middle where the rib will go. The shape of these forms were "best guesses", the transom worked out fine, we had to experiment with the center form. In the picture you can see the ty wraps we used to pull the stern and bow in place.

The bow was epoxy glued and screwed together, an uncle john type rib inserted in the middle, the transom replaced with a cedar one and epoxy glued in place.

We turned the boat upside down on sawhorses, checked for square, and glued the cedar/fiberglass bottom on with plenty of epoxy wood floor mix. Clamped it in place with a brad gun.After the mix cured mike trimmed the bottom flush with a multi tool. Followed up with a belt sander and sanding block.

The forum will only accept 10 pictures/post so I'll try posting this and continue in another post or reply to this post.
To be continued
It's become a tradition with our Grand kids if they want to build a pirogue, 10 is the magic age. After that---- just work it out with parents and Grandpa and you're good to go. Mike is one of our several Louisiana grand kids,and is a student at the Shreveport Education Center for Autism. Mike had become very fond of one of our "herb lite" aka 17 lb pirogues, so when he turned 10, his heart was set on a aluminum SOF instead of the standard Uncle Johns Pirogue. About 2 years ago he and I set out to build his boat. The distance between Mike and ,I coupled with some old people ailments stretched the build time, but not our enthusiasm. The build started in La, moved to Texas, then to Kansas, but it's done now! I am so proud of Mike, he stayed enthused, closely followed directions, and completed the boat with very little hands on help from me.
This isn't so much a detailed "how to build post", but also about our journey together, I wouldn't trade it for the world.
We decided on a cedar strip/ fiberglass bottom, as the luan bottoms on previous builds didn't wear well. Recycled cedar fence boards for the bottom, a new cedar 2" x 6 x 14' for the frame, and a 25' roll of 12" aluminum trim coil, took care of the basic materials.
First step was to build a table. Sawhorses, 2x4's and plywood.
The cedar 2x6 was ripped to 3/4 x 1 1/2 about 14 feet long. These were laid out in the ladder shape for the framework with 45 degree slope a the ends. Total frame length of 12' so the 25' of aluminum fit with one foot left over. The cross pieces of the frame were glued in place with epoxy/wood flour mix and secured with T 50 stables for clamping.
The stems (end pieces of the frame ) were trimmed. A thick bead of epoxy mix was placed on the outside of the frames and the pre trimmed to shape aluminum was stapled in place over the wet epoxy mix.
While that set up we moved on the assembling the cedar bottom. The fence pickets were ripped into strips and planned to 1/4" thickness. The ends of the strips were cut at 45 degrees across the wide side for joining (scarfing) the bottom to length. A sheet of plastic drop cloth was placed over a rough pattern of the bottom shape, them the strips were glued together and clamped in place by shooting brads through 1' X 1' sticks. The sticks are covered with packing tape to keep them from sticking to the glue. We used tight bond III for this step.
After the glue was set we removed the sticks and brads, and sanded the rough shaped bottom, and gave it a "saturation" coat of epoxy.
The bottom was then covered with fiber glass cloth and wet out with epoxy. The excess cloth on the edges was trimmed.
Now that we had the major components, it was time to put the boat together. The sides were bent around two forms, one of the forms was shaped to represent the transom and a wider form near the middle where the rib will go. The shape of these forms were "best guesses", the transom worked out fine, we had to experiment with the center form. In the picture you can see the ty wraps we used to pull the stern and bow in place.
The bow was epoxy glued and screwed together, an uncle john type rib inserted in the middle, the transom replaced with a cedar one and epoxy glued in place.
We turned the boat upside down on sawhorses, checked for square, and glued the cedar/fiberglass bottom on with plenty of epoxy wood floor mix. Clamped it in place with a brad gun.After the mix cured mike trimmed the bottom flush with a multi tool. Followed up with a belt sander and sanding block.
The forum will only accept 10 pictures/post so I'll try posting this and continue in another post or reply to this post.
To be continued