OK, JEM...... | Page 2 | SouthernPaddler.com

OK, JEM......

skiabq

Active Member
May 6, 2006
33
0
Albuquerque
Based on those numbers I would be comfortable in the 20" width and maybe a 46" or 48" length. I will wait and see what islandpiper says. Is there any way to make the shape of the opening the more conventional shape? Not that it will ever get rolled, I just like the shape better.

Thanks for all your hard work and quick responses Matt.
 

skiabq

Active Member
May 6, 2006
33
0
Albuquerque
The cockpit shape that I am thinking of is the shape of the Sundance (too big) or the Chesapeake LT16 (too small). They are both pretty much the same shape and when I look around at other kayaks they all seem to have a similiar type of shape.
 

JEM

Well-Known Member
You mean like

sundance-12-air-top-06.jpg


with the more rounded cockpit front? I'd have to do it in an arced section in the front like the aft cockpit. Otherwise you'll be geting into steam bending to get the plywood to fit the shape.

The alternative is to make the coaming with a bunch of verticle strips but that takes a long time.
 

JEM

Well-Known Member
That statement about the cockpit was probalby clear as mud. Here's what I mean:

Cockpit.JPG


It would be too difficult to get the coaming to wrap around. It can be done of course, but it's time consuming and I'd like to keep this as simple as possible.
 

oldsparkey

Well-Known Member
Aug 25, 2003
10,479
123
Central , Florida
www.southernpaddler.com
If the builder would draw out the shape of the coaming then divide the cockpit down the center making it two pieces. ( a left and a right section) Then they could saw out six half sections ( three for each side) and butt joint them together then stack them and epoxy each together.

Make two more slightly larger ones for the top section so a lip would stick out all the way around the top but flush on the inside, it would be used to hold the cockpit cover on and as a barrier to stop any water from going over the top of the coaming.

Chuck.
 

JEM

Well-Known Member
I thought about this option Chuck. Eats up a lot of plywood quickly and will take plenty of extra time to draw, cut, and assemble.

I don't know...is that little bit extra roundness in the front worth it?

The V shaped front will shed waves and wind better, much like a Kruger Sea Wind.

Plus it allows for a deeper coaming to install padeyes and lots of other customization too. Would make for a nice area for a small sailing mast. But I'll go with the majority.
 

hairymick

Well-Known Member
Dec 8, 2005
2,107
2
Queensland, Australia
Sorry guys, I didn't realise there was allready a second page to this thread. :oops:

Another idea that might suit some (me) :oops: would be to make a hybrid of this one. ie the front of the cockpit coaming as in Matts original drawing could be replicated in the rear as well. Making like a decked canoe or perhaps a canyak? :D
 

islandpiper

Well-Known Member
cockpit size and outlline

Matt, here are some shot of my (dusty) Dennis Davis design....length of cockpit is 22 inches, width is 16 inches, flat deck behind the cockpit and nice, round deck ahead, note the laminated deckbeam in the pics. Also, the built-up cockpit rim, made of layers of plywood, just glued up with the adhesive of the day, that brown plastic resorcinol or whatever it was, left for 24 hours and then shaped up with a rough rasp and then sanded.

Also note the overall shape of the cockpit. In spite of the apparent TIGHT dimensions, it didn't feel constrictive when I built it and paddled it. Hope to get he out and wash some of the dust off in the little tidal rivers near here yet this fall. It has been pretty crazy moving twice and having a hurricane......

Hopefully, things can get back to (what we call) NORMAL here in Louisiana pretty soon.

Thanks for the new yak sketches, that is one cool boat....and pretty close to what I had in mind. I do like the knee room INSIDE though and torturing the deck into the shape shown wasn't all that hard.

Yes, I know I left the wire ties inplace......yes, I know there are 3/4" silicone Bronze boat nails still in place.....yes, we used to build with glass and polyester resin.....No, I don't think I'm as old as Chuck, or Baseball.

heh heh heh
'
Islandpiperhttp://www.forumpictureprocessor.com/pictureprocessor/images/cockpit%20view.jpg

[url=http://www.forumpictureprocessor.com/pictureprocessor/images/side%20view_6.jpg]http://www.forumpictureprocessor.com/pi ... view_6.jpg[/url]


[url=http://www.forumpictureprocessor.com/pictureprocessor/images/deckbeam.jpg]http://www.forumpictureprocessor.com/pi ... ckbeam.jpg[/url]


[url=http://www.forumpictureprocessor.com/pictureprocessor/images/forward%20bulkhead.jpg]http://www.forumpictureprocessor.com/pi ... lkhead.jpg[/url]
 

islandpiper

Well-Known Member
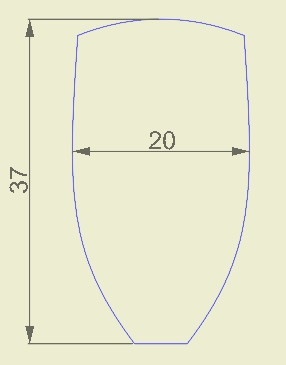
molded, stacked cockpit ring

Matt, as I remember, I used off cuts and scrap....when stacked it really does not matter which way the plies run, in fact, a random stack is probably stronger. I made a cardboard template of the lower rings and then used it for the upper rings and just made them wider, keeping the inside profile/shape the same. Now, of course, I'd use Gorrila Glue for the strength and gap filling characteristics.

If you make parts of most of the first ring and glue them on, just doing a razosaw work to make joints tight, then when you can, set the next ring, and use the razor saw to make tight joints.and so forth. They just MOLD into shape, and it seems that the whole assembly must be pretty strong, like any laminated beam, it is just that this beam is a compound curve.

The deck beam was made of thin strips, bent over a male mold and glued as a group, then sawed t the proper width, and then length-fitted and set into place.

Somehow, I like this idea better than setting a solid-wood coaming on edge, against a thin ply deck and hoping it will stay.

Now, remember, i am a luthier, so causing wood in thin sections to find curves it never imagined while in the tree is what I do each day. But, really, making a cockpit ring capable of taking a spray shield or shower cap or eskimo-roll skirt is not all that hard.

Looking forward to seeing the revised sketches.

got my new benches built in the shop here at home, now putting up some pegboard on the walls to hold the tools I usually set down and can't find.

Carry on. Islandpiper
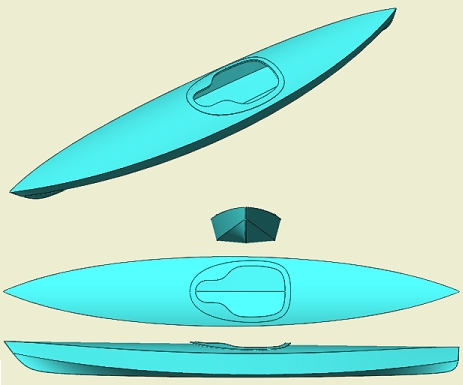
 

skiabq

Active Member
May 6, 2006
33
0
Albuquerque
Thanks for those pics, I think they helped a lot. I like the curved deck instead of 2 seperate pieces. Maybe we can keep Matt busy for a week or two coming up with another set of plans for us plywood boat junkies;-)
 

islandpiper

Well-Known Member
deck

Hello skiabq, about that deck: there is a joint, just a simple butt-joint ACROSS the boat, at about the midpoint of the cockpit, with a butt-block on the underside, left and right. That allows the deck to be shaped UP the way it is. You could never stretch a sheet up that way just in the front of the cockpit. By doing it this way you can get a pretty sexy curve in the fore-deck and still have the rear nearly flat.

If you get into this and want to try it I have a list of cuss-words that may help........ Actually, a big box of C-clamps and a pail of really hot water is pretty useful.

Cheers, Islandpiper
 

tioga

Active Member
May 9, 2005
34
0
NE Pennsylvania
It has been awhile since I have last posted so hello to all.As soon as i began reading the thread and than saw the sketches from JEM I was hooked.I was just wondering on the number of sheets that would be required for this craft,in say a 12 or 14 foot model and a rough weight using standard sheets of Luan found at Home Depot,and of course Epoxy.
JEM have you come up with a name for this and will it be added to your site.I have a friend who needs a break in his 9-5 life and he has been talking about kayaks since spring,but his budget isn't up to it.Plus wood boat building soothes the savage beast and he can use that.
Thanks
tioaga
 

oldsparkey

Well-Known Member
Aug 25, 2003
10,479
123
Central , Florida
www.southernpaddler.com
From the for what it is worth department and since they say a picture is worth a thousand words ..... here are a few thousand words about the cockpit of my kayak.

It is 33 inches on the inside from the front to the back and 36 inches to the outside of the coaming's outer lip. The width is 17 1/2 inches on the inside at the widest part (by the connection for the backrest) and 21 inches to the outside of the coamings lip.

This picture shows how the coaming is built up on layers of wood.
kayak%20001.jpg


A view from the back side.
kayak%20002.jpg


From the front.
kayak%20008.jpg


A birds eye view.
kayak%20011.jpg


A better one.
kayak%20015.jpg


The Front.
kayak%20016.jpg
 

JEM

Well-Known Member
Well this is turning into a group effort. Awesome! 8) :D

Plywood: I'm guessing 3 or 4 sheets will do it but I haven't gotten that far just yet.

I'm guessing 50 pounds would be the most it would weigh using less-expensive materials (we'll save the debate about materials for another thread. Easy Jack...down boy). That's a really conservative guess.

I'm going to start tinkering with the panel layout. I want to make this a simple yak that minimizes cost, but maximizes materials and fun! So if it means changing the length a bit to keep costs down, I'll do that as long as it doesn't change TOO much. :wink:

I had no idea this idea would take off like this. Just goes to show, pay attention to what builders want...not what you THINK they want.