
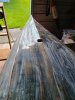
Was very nervous about this part, even when I was only at the wood cutting stage. By this point that internal structure has been wrestled into place and filleted in. It was my first time glassing and it would have been easier with help. Small batches of epoxy and try not to overwork it is key. Oh, and you can always put more epoxy on, but if you put too much at one time it ends up on the floor.
Sabalo build log
- Thread starter 3rdcoastkayak
- Start date
You are using an out of date browser. It may not display this or other websites correctly.
You should upgrade or use an alternative browser.
You should upgrade or use an alternative browser.
Right there, it looks like there might be a longitudinal twist in the hull. It is critical to have everything straight BEFORE you apply any epoxy. Do your instructions mention the height of the formers? Do they mention positioning the formers and wired-on skin assembly upside down on leveled sawhorses, then sight checking the still-flexible hull for alignments?
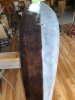
After the struggle. Some may notice that the blue color didn't stay. That was intentional to a point. I had done some LIGHT sanding to expose the wood. I wanted people to know it was wood. During the epoxy pour some of the color came out as I was spreading. Icould see it in the epoxy I scraped off. I actually love how it turned out, though in the sun there is little blue left on the outside.
Oops! I looked at only the first picture. Disregard last transmission.
Yes, hanging fiberglass is tricky business. But the outside is easier than the inside. But only tje floor is important to be glassed. If you glass partway up the insides, lay the boat up on one side at a time.
When applying epoxy, scrape off more than you put on, or the boat will be heavy.
Yes, hanging fiberglass is tricky business. But the outside is easier than the inside. But only tje floor is important to be glassed. If you glass partway up the insides, lay the boat up on one side at a time.
When applying epoxy, scrape off more than you put on, or the boat will be heavy.
Yes to all Jack. Took great care in that leveling step. It may be my picture taking skills because it looks wonky to me as well. Trust me, hours went into leveling and tightening and loosening and re-wiring and starting all over. It is not perfect by far, but was a straight as a newbie could get it.Right there, it looks like there might be a longitudinal twist in the hull. It is critical to have everything straight BEFORE you apply any epoxy. Do your instructions mention the height of the formers? Do they mention positioning the formers and wired-on skin assembly upside down on leveled sawhorses, then sight checking the still-flexible hull for alignments?
The bottom looks plumb and straight, so you got the geometry goog. The variegated color is interesting.
Taking the pretty shine off...
After the required amount of coating with epoxy it was time to start the smoothing and fairing. Once again, not perfect. I was able to find the high and low spots in the hull with all the hand rubbing and wiping. Tried wet sanding for a time but that was a mess. Sander hooked to an old vacuum worked well though.
After the required amount of coating with epoxy it was time to start the smoothing and fairing. Once again, not perfect. I was able to find the high and low spots in the hull with all the hand rubbing and wiping. Tried wet sanding for a time but that was a mess. Sander hooked to an old vacuum worked well though.
Attachments
Since you fellas have been doing this far longer than I have you know how boring and tedious the back and forth between sanding and epoxy application is. We'll after all that came 4 our 5 coats of Captains spar varnish, which equals more sanding in between coats, though to be fair only light sanding. The Captains varnish went on well and only featured minimal sanding between coats. Other than that I installed some minor components like footrests and rod holder's. This is how she looks.
Attachments

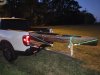
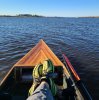
First fishing trip was yesterday to Cypremort Point State Park. The winds were SUPPOSED to be between 11-14 mph, by 10:30 they were at 18. Another guy in a Hobie was struggling to peddle off that beach. Coming in at 2pm was interesting for a new guy like me. However, the boat road the waves well and I never felt uncomfortable, except for sitting for hours on end fishing. Sorry, no slime yet, but not for lack of trying. She ended up weighing in at 50-52 lbs without seats and gear. Went light on gear 2 poles, net, stake out pole, 1 Plano box, no live bait(what the people that did catch caught on).
Attachments
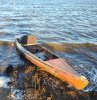
For those who are interested, she is no Nick Schade built boat, but she is really easy to paddle, tracks straight, which surprised me despite the imperfections. The scuppers were a pain and leaked at first. I re-applied epoxy with fillet material to keep it from running out and onto the floor. Worked great after that. I have custom made handles on the sides and front, part of what took so long. I had to learn the knots, then how to make my own rope, etc. Would definitely have been easier to buy a Tupperware boat, but easy is boring.
Last edited:
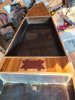
I like the looks of the work you did. I’m interested in the convex bottom. Why is the bottom shaped like that? Seems like it would add to drag?
Can't really explain that Jack! It's the way it happened. I'm sure it is more my lack of knowledge and experience in kayak building than any inherent design.
Looking at the page above, perhaps it was designed to be a flatter bottomed boat. Anyhow, it's what I have now. Maybe a second attempt is called for.
Looking at the page above, perhaps it was designed to be a flatter bottomed boat. Anyhow, it's what I have now. Maybe a second attempt is called for.
Ohh! there’s nearly always a “second attempt”. I quit building after my third “second attempt”. Others are still attempting. sigh
I like the looks of the work you did. I’m interested in the convex bottom. Why is the bottom shaped like that? Seems like it would add to drag?
What are you seeing? I thought it is a shallow V bottom. Why would that add to the drag?
In one picture, it looks like a flst bottom, but witt a pair of panelstipped upwards going crossways. It puts a crossways ridge across the middle of the bottom? In the two pictures dated 20210924, the left hand shot.
Probably a trick of the light?
Probably a trick of the light?
That is considered the "cockpit". Angles that way for drainage with a scupper to either side of the ridge. It has support structure underneath and is not the bottom of the boat. Sorry for any confusion.In one picture, it looks like a flst bottom, but witt a pair of panelstipped upwards going crossways. It puts a crossways ridge across the middle of the bottom? In the two pictures dated 20210924, the left hand shot.
Probably a trick of the light?
OK. A very different design than what I’m used to. Thanks. That extra wood also serves to explain the weight factor.