
New build - first build
- Thread starter savannahkelly
- Start date
You are using an out of date browser. It may not display this or other websites correctly.
You should upgrade or use an alternative browser.
You should upgrade or use an alternative browser.
As of right now, I am not planning for any hatches. I want to get out and use them a few times to see how the boat performs. To start with they are just going to be enclosed spaces for floatation. I can always go back and add hatches if i need them. I would probably get some like the ones found at West Marine, the round 6" or 8". I plan on this to be a fishing platform so I am going to rig it with rod holders, milk crate, anchor trolley, seat and depth finder.
Finally got back to working on boat #1 today. Started this morning by putting a final coat of resin on the decks and glassed one section of boat #2 before I ran out of resin. Once it was dried I taped off the edge between the decks and outer rails for painting the outsides of the boat.
Sorry for the graininess of the pictures. They were off my cell phone.

When that was taped off, it was time to pull out the compressor and paint gun to apply the paint. I chose Safety Red and Safety Yellow for my colors. Besides they are the same colors as the Kansas City Chiefs. Hopefully it will help me to been seen on the waters here around savannah. As many stinkpots and jet skis that are out on the water you cant be too carefull.
Here is a couple of pics once the red was sprayed on and taped off for the yellow.

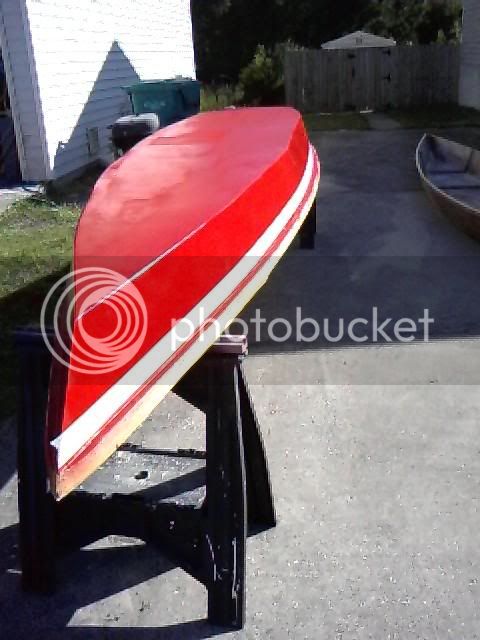
And here are a couple once I had the yellow applied to the outer rail.


I will apply spar varnish to the decks and insides of the boat. I am hoping for the maiden voyage to happen next weekend once the paint and varnish have had a week to cure.
Sorry for the graininess of the pictures. They were off my cell phone.
When that was taped off, it was time to pull out the compressor and paint gun to apply the paint. I chose Safety Red and Safety Yellow for my colors. Besides they are the same colors as the Kansas City Chiefs. Hopefully it will help me to been seen on the waters here around savannah. As many stinkpots and jet skis that are out on the water you cant be too carefull.
Here is a couple of pics once the red was sprayed on and taped off for the yellow.
And here are a couple once I had the yellow applied to the outer rail.
I will apply spar varnish to the decks and insides of the boat. I am hoping for the maiden voyage to happen next weekend once the paint and varnish have had a week to cure.
I know what you mean about the stink boats and jet skis. . . Have lost many a friend due to the operators of those things not paying alot of attention to them folks out paddlin'. . .
Sadly, too, a lot of them see us and just don't give a rat's ar$e. . .
Be careful when you're out there... It's a great lookin' boat... have yerself some fun.
Sadly, too, a lot of them see us and just don't give a rat's ar$e. . .
Be careful when you're out there... It's a great lookin' boat... have yerself some fun.
Got busy today and applied the varnish to the decks and insides of the boat. Here is a pic of it prepped for varnish.

Pics of varnish applied to the decks and sides.

A closeup of the stern deck

And finally a pic of the bottom and outer rails.

Now to let it set for the week and cure. I will need to get a paddle and pfd next weekend and we are ready to add water!!!
Pics of varnish applied to the decks and sides.
A closeup of the stern deck
And finally a pic of the bottom and outer rails.
Now to let it set for the week and cure. I will need to get a paddle and pfd next weekend and we are ready to add water!!!
I like your decks. I've been trying to figure out what to do at the ends of my pirogue. How to attach a rope? Carrying handles/loops? etc. etc. I'm thinking I may build a small deck, but leave it open, and incorporate a handle into the design. My mind is running... Get back to work... :evil:


rpecot said:I like your decks. I've been trying to figure out what to do at the ends of my pirogue. How to attach a rope? Carrying handles/loops? etc. etc. I'm thinking I may build a small deck, but leave it open, and incorporate a handle into the design. My mind is running... Get back to work... :evil:
You could do something like this on the ends......

A short deck with a hand hold which is nothing more then a piece of wood doweling ( cut to fit ) epoxied to each side under the inside railing. It is something I have done to several boats.
The others had epoxy end pours and holes drilled threw the sides of the bow and stern. Then the inside of the hole was epoxied to seal the wood from where the drill went threw.
I like the wood doweling for a simple reason , it is easier on the hands when moving the boat around. Plus on the last trip I attached an line to it and the end to the back ( stern) one making a wide loop out to the side. This let me line the boat along the shore but out from the shore when walking it threw the shallows and again when walking it against that gentile 50 mph breeze we were trying to paddle against.
One line , one boat and it tagged along out in the river just like it was meant to. It was on about a 10 to 15 degree , bow out angle from me.
Plus those handles make a great safety item when car topping the canoe , I run a safety line from them to the front and back bumpers , respectively. ( front to front , back to back)
Chuck.
That's a nice solution, 'tick. 8) Been meaning to ask when I saw this before; is that a rope hole? flagpole holder? picnic umbrella holder? :lol:seedtick said:just one solution
we usually pass a rope thru that hole
but you can also put a candle in it for travelling at night
or a pointy bottom beer can or whatever
but you can also put a candle in it for travelling at night
or a pointy bottom beer can or whatever
If you drill a hole from side to side, behind the stem, about 1" Dia, you can slide in a length of 3/4" PVC and glass it in, inside and out, and have a nice STRONG tie down point. piper
rpecot said:I like your decks. I've been trying to figure out what to do at the ends of my pirogue. How to attach a rope? Carrying handles/loops? etc. etc. I'm thinking I may build a small deck, but leave it open, and incorporate a handle into the design. My mind is running... Get back to work... :evil:
Piper....
I thought all of us furnished the answers for him to chose from but I guess I was wrong , chances are he is just asking and not looking for ideas. After all that is the simplest part of building a boat. :roll: No one knows there boat better then the builder and what to do to it for there use.
Sure is not rocket science and speaking of that ... we have put another used vehicle into space with a crew of 7 , watched it take off today while standing outside the front door to this place. What a sight to see and it always amasses me how such a large item can go so dang fast into outer space. I will bet anything they know what or where to have there lines fastened to the craft for there advantage. Dam , they even know which ones to leave back here. :lol:
Chuck.
That is the only thing I can think of I probably overlooked during this build. I guess i will see how the boat handles and what situations I get into with it. As was said earlier, things can be added at any time. But i realize some kind of handle or rope will be needed. I could always just run a length of rope thru the inner rails to start with and go from there.
With all the rain we have been getting here lately, I haven't had a chance to try out my boat. But with the long weekend, I said I was going to get it wet one way or the other. Around noon today the weather broke up enough to give me a chance and get out on the water. Didnt have my son's digital camera so only got one with my cell phone.

I was very pleased with the way it handled. It was very comfortable paddling. I was out when the tide was falling so I was out of the wind for most of the time i was on the water. But I could see that the wind can blow you around pretty good. Now to get it rigged for fishing!! I am looking forward to exploring all the little creeks and coves here on the south side of savannah. I love the amount of room there is inside of this boat. Now if someone upstairs would turn off the water spigget and let us dry out alittle!!!
I was very pleased with the way it handled. It was very comfortable paddling. I was out when the tide was falling so I was out of the wind for most of the time i was on the water. But I could see that the wind can blow you around pretty good. Now to get it rigged for fishing!! I am looking forward to exploring all the little creeks and coves here on the south side of savannah. I love the amount of room there is inside of this boat. Now if someone upstairs would turn off the water spigget and let us dry out alittle!!!
That came out nice.
Where did you get your seat?
What sort of paddle did you end up using? Single, or double?
George
Where did you get your seat?
What sort of paddle did you end up using? Single, or double?
George
I just went to the closest WallyWorld and bought a small beach chair. Worked very well and was pretty comfortable. Also just used a single 5ft paddle from WW. Eventually I will make me one with the wood I have in my garage, but will need to finish my son's boat first.
Kelly, try a double ended kayak paddle and see if you like it. Most paddlers can travel faster, turn easier, and tire less. You get a lot more paddle into the water, and don't have to do steering corrections via J stroke and all that folderoll. Learn a simple bow rudder and stern rudder strokes and you will see how much faster you can turn, and how much better when you're turning against a stiff breeze.
To maximize your use of it, don't paddle by windmilling your arms like most folks mistakenly do. Hold the paddle out in front of you in a comfortable position, dip one end in the water, and turn from the waist in that direction. When the paddle is as far back as your hip, roll the other end into the water and turn in that direction from the waist. Keep the paddle shaft parallel with your shoulders; turn from the waist and use your back muscles for more power and less fatigue.
When starting to learn this, do it slowly so you get the pattern. It's more important to learn how to do it right than to generate speed at first. In 10 to 15 minutes you will already be going faster this way than you ever would with a single blade paddle.
After trying one, if you don't like it, just go back to a single blade paddle and enjoy.
While waiting for an order of resin to arrive so i can finish up the 2nd boat, I got busy and added a couple of items to the first boat. After going out a couple of times I realized that an anchor trolley and bow handle were things I needed. Using Ron's method of making soft pad eyes, I installed 4 of them around the boat.

I used #10 threaded inserts and #10 stainless screws with finish washers. Then I added an aluminum carbiner then threaded the rope thru them. The ends were then tied off to another aluminum carbiner.

Now I feel much better about being able to position myself in the current.
I also added a handle to the bow to make it easier pull if the situation presents itself.

I used #10 threaded inserts and #10 stainless screws with finish washers. Then I added an aluminum carbiner then threaded the rope thru them. The ends were then tied off to another aluminum carbiner.
Now I feel much better about being able to position myself in the current.
I also added a handle to the bow to make it easier pull if the situation presents itself.
savannahkelly said:While waiting for an order of resin to arrive so i can finish up the 2nd boat, I got busy and added a couple of items to the first boat. After going out a couple of times I realized that an anchor trolley and bow handle were things I needed. Using Ron's method of making soft pad eyes, I installed 4 of them around the boat.
I used #10 threaded inserts and #10 stainless screws with finish washers. Then I added an aluminum carbiner then threaded the rope thru them. The ends were then tied off to another aluminum carbiner.
Now I feel much better about being able to position myself in the current.
I also added a handle to the bow to make it easier pull if the situation presents itself.
Nice addition. I've got a couple of those clips and ropes laying around. I'm going to have to pirate your design.
")